第5回(最終回) サーバー連携
第5回(最終回) サーバー連携
連載最終回となる今回は、データグリッドとウェブアプリケーションを連携させ、データグリッドに表示させるデータをサーバーから受け取る仕組みを説明します。
前回までと比べ、JAVAやEclipseなどが登場するため、多少難しくなると思います。ただ、なるべく分かりやすく説明したいと思いますので、お付き合いくださいませ。
目次
- 準備
- Eclipseプロジェクト作成
- サーバー側設定
- JAVAクラス作成
- 画面作成
- 表示機能実装
- 実行
作業開始
準備
今回の作業では、JAVA側のプログラムを作成する必要があるので、Eclipseを用意します。また、サーバーとクライアントを連携するために、DWR(Direct Web Remoting)というライブラリが必要になります。必要となるソフトウェアを下記にあげますので、ダウンロードして適当な場所に展開してください。
- Eclipse (http://www.eclipse.org/downloads/)
お手持ちのOSにあったzipファイルをダウンロードし、適当な場所に展開する。 - DWR (http://directwebremoting.org/dwr/downloads/)
dwr.jarをダウンロードするだけでよい。 - Spring Framework (http://www.springsource.org/download)
3.0.5.RELEASEのダウンロードに進み、spring-framework-3.0.5.RELEASE.zipをダウンロードして適当な場所に展開する。 - commons logging (http://commons.apache.org/logging/download_logging.cgi)
Binariesにあるzipをダウンロードし、適当な場所に展開する。 - Tomcat (http://tomcat.apache.org/download-60.cgi)
zipファイルをダウンロードし、適当な場所に展開しておく。なお、本稿執筆時点の最新版は「6.0.32」。
以上で準備は完了です。
Eclipseプロジェクト作成
Eclipseを起動して、今回使用するプロジェクトを作成しましょう。まずはメニューから、「ファイル>新規>プロジェクト」と進めます。
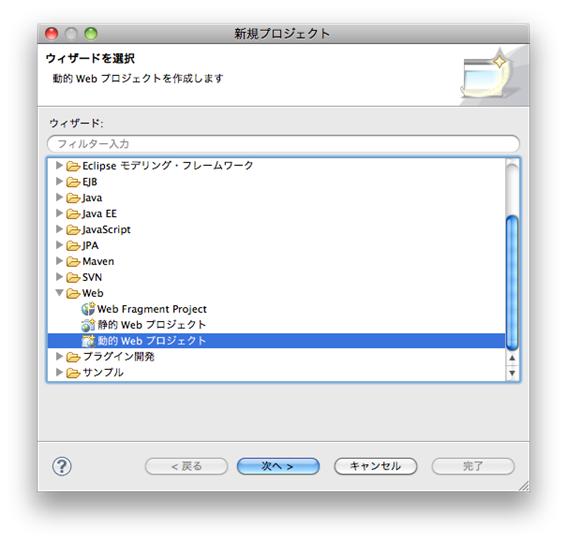
図1. 新規プロジェクトダイアログ
新規プロジェクトダイアログから、動的Webプロジェクトを選択して「次へ」ボタンをクリックします。
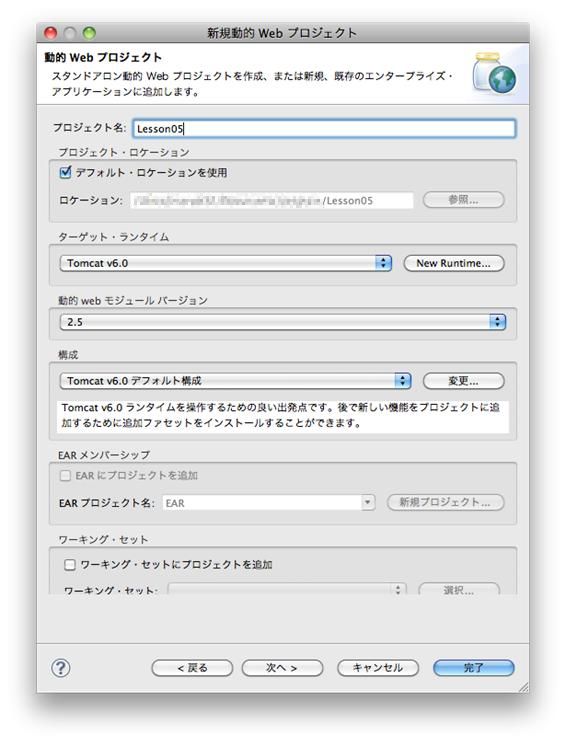
図2. 新規動的Webプロジェクトダイアログ
新規動的Webプロジェクトダイアログにてプロジェクト名に「Lesson05」を入力します。ターゲット・ランタイムは、準備で用意したTomcatを指定します(プルダウンにTomcat v6.0が表示されない場合は、隣の新規ボタンを押して作成してください)。そして、「完了」ボタンをクリックします。
作成されたプロジェクトの「WebContent/WEB-INF/lib」配下に、準備で用意したSpring Frameworkの「dist」配下にあるjar全てと、「dwr.jar」および「commons-logging-1.1.1.jar」をコピーします。
これで、Eclipseプロジェクト作成は完了です。
サーバー側設定
サーバー側がクライアントと連携できるようにするため、いくつかの設定を行います。
まずは、Spring FrameworkおよびDWRの設定をWebcontent/WEB-INF/web.xmlに記述します。
|
<?xml version="1.0" encoding="UTF-8> <web-app xmlns:xsi="http://www.w3.org/2001/XMLSchema-instance" xmlns="http://java.sun.com/xml/ns/javaee" xmlns:web="http://java.sun.com/xml/ns/javaee/web-app_2_5.xsd" xsi:schemaLocation="http://java.sun.com/xml/ns/javaee http://java.sun.com/xml/ns/javaee/web-app_2_5.xsd" id="WebApp_ID" version="2.5"> <display-name>Lesson05</display-name> <context-param> <param-name>contextConfigLocation</param-name> <param-value>/WEB-INF/spring/*.xml</param-value> </context-param> <listener> <listener-class>org.springframework.web.context.ContextLoaderListener</listener-class> </listener> <servlet> <servlet-name>dwr-invoker</servlet-name> <servlet-class>org.directwebremoting.spring.DwrSpringServlet</servlet-class> <init-param> <param-name>debug</param-name> <param-value>true</param-value> </init-param> <init-param> <param-name>activeReverseAjaxEnabled</param-name> <param-value>true</param-value> </init-param> <load-on-startup>1</load-on-startup> </servlet> <servlet-mapping> <servlet-name>dwr-invoker</servlet-name> <url-pattern>/dwr/*</url-pattern> </servlet-mapping> <welcome-file-list> <welcome-file>index.html</welcome-file> <welcome-file>index.htm</welcome-file> <welcome-file>index.jsp</welcome-file> <welcome-file>default.html</welcome-file> <welcome-file>default.htm</welcome-file> <welcome-file>default.jsp</welcome-file> </welcome-file-list> </web-app> |
続いて、JAVAとSpring Frameworkを関連付けるためのXMLファイルを作成します。Webcontent/WEB-INF配下に「spring」フォルダを作成し、その中に「applicationContext.xml」ファイルを作成します。applicationContext.xmlの中身は、後ほどの工程で説明しますので、今は作成するだけで良いです。
JAVAクラス作成
アプリケーションで使用するJAVAクラスを作成します。まずは、src配下に「examples.lesson05」パッケージを作成します。さらにその配下に、「view」「service(その配下にimpl)」「dto」パッケージをそれぞれ作成します。
最終的なパッケージ構成は、下記の通りとなります。
|
src └ examples.lesson05 ├ dto ├ service │ └ impl └ view |
続いてクラスを作成します。なお、Lesson05Serviceだけはインターフェースを作成してください。view配下には「Lesson05View」、service配下には「Lesson05Service(impl配下には「Lesson05ServiceImpl」)」、dto配下には「Lesson05Dto」をそれぞれ作成します。 ここで、クラス作成は一旦中断します。後続の工程で、中身のコードを記述します。
画面作成
画面は、前回の記事(リンクを貼る)の準備編を参考に、Lesson04のファイルをLesson05用にコピーします。コピーしたものを、Webcontent配下にコピーします。最終的なディレクトリ構成は、下記の通りとなります。
|
WebContent └ lesson05 ├ codebase └ lesson05.html |
表示機能実装
さて、ここからサーバー側とクライアントを連携するための機能を実装します。 まずは、サーバー側から実装を行います。Lesson05Dtoを、下記の通りに記述してください。
package examples.lesson05.dto;

import java.io.Serializable;

public class Lesson05Dto implements Serializable {

    /**
     * serialVersionUID.
     */
    private static final long serialVersionUID = 8099027348697290650L;

    private String id;

    private String name;

    private String description;

    /**
     * @return id
     */
    public String getId() {
        return id;
    }

    /**
     * @param id セットする id
     */
    public void setId(String id) {
        this.id = id;
    }

    /**
     * @return name
     */
    public String getName() {
        return name;
    }

    /**
     * @param name セットする name
     */
    public void setName(String name) {
        this.name = name;
    }

    /**
     * @return description
     */
    public String getDescription() {
        return description;
    }

    /**
     * @param description セットする description
     */
    public void setDescription(String description) {
        this.description = description;
    }
}
続いて、Lesson05Service と Lesson05ServiceImpl を、下記の通りに記述してください。
package examples.lesson05.service;

import java.util.List;

import examples.lesson05.dto.Lesson05Dto;

public interface Lesson05Service {

    List<Lesson05Dto> getList();

}
package examples.lesson05.service.impl;

import java.util.ArrayList;
import java.util.List;

import org.springframework.stereotype.Service;

import examples.lesson05.dto.Lesson05Dto;
import examples.lesson05.service.Lesson05Service;

@Service
public class Lesson05ServiceImpl implements Lesson05Service {

    @Override
    public List<Lesson05Dto> getList() {
        List<Lesson05Dto> result = new ArrayList<Lesson05Dto>();

        Lesson05Dto dto1 = new Lesson05Dto();
        dto1.setId("101");
        dto1.setName("山田太郎");
        dto1.setDescription("俳優");
        result.add(dto1);

        Lesson05Dto dto2 = new Lesson05Dto();
        dto2.setId("102");
        dto2.setName("鈴木一郎");
        dto2.setDescription("会社員");
        result.add(dto2);

        Lesson05Dto dto3 = new Lesson05Dto();
        dto3.setId("103");
        dto3.setName("斉藤花子");
        dto3.setDescription("フリーター");
        result.add(dto3);

        return result;
    }

}
最後に、Lesson05Viewを下記の通りに記述してください。
package examples.lesson05.view;

import java.util.List;

import javax.annotation.Resource;

import org.springframework.stereotype.Component;

import examples.lesson05.dto.Lesson05Dto;
import examples.lesson05.service.Lesson05Service;

@Component
public class Lesson05View {

    @Resource
    private Lesson05Service service;

    public List<Lesson05Dto> getList() {
         return service.getList();
    }
}
次に、クライアントと連携するための設定を行います。作成しておいたapplicationContext.xmlを、下記の通りに編集します。
<?xml version="1.0" encoding="UTF-8"?>

<beans xmlns="http://www.springframework.org/schema/beans"
    xmlns:xsi="http://www.w3.org/2001/XMLSchema-instance"
    xmlns:dwr="http://www.directwebremoting.org/schema/spring-dwr"
    xmlns:context="http://www.springframework.org/schema/context"
    xsi:schemaLocation="http://www.springframework.org/schema/beans
    http://www.springframework.org/schema/beans/spring-beans-3.0.xsd
    http://www.directwebremoting.org/schema/spring-dwr
    http://www.directwebremoting.org/schema/spring-dwr-2.0.xsd
    http://www.springframework.org/schema/context
    http://www.springframework.org/schema/context/spring-context-3.0.xsd">

    <context:component-scan base-package="examples.lesson05"/>

    <context:annotation-config/>

    <bean id="lesson05View" class="examples.lesson05.view.Lesson05View">
        <dwr:remote javascript="Lesson05">
            <dwr:include method="getList"/>
       </dwr:remote>
    </bean>

    <dwr:configuration>
        <dwr:convert type="bean" class="examples.lesson05.dto.Lesson05Dto"/>
    </dwr:configuration>

</beans>
次に、lesson05.htmlに記述されているJavaScriptの、loadメソッドを下記の通りに編集します。
※ 下記の三行を追加しておく
  <script type="text/javascript" src="../dwr/engine.js"></script>
  <script type="text/javascript" src="../dwr/util.js"></script>
  <script type="text/javascript" src="../dwr/interface/Lesson05View.js"></script>
    load : function() {
      var self = this;
      Lesson05View.getList(function(result) {
        var json = "";
        for (var i = 0; i < result.length; i++) {
          var dto = result[i];

          // JSONデータを作成する
          json += "{id: " + (i + 1) + "," +
            "data: [\"" + dto.id + "\",\"" + dto.name +
            "\",\"" + dto.description + "\"]},";
        }

        var grid = eval("({rows:[" + json.substring(0, json.lastIndexOf(",")) + "]})");
        self.mygrid.clearAll();
        self.mygrid.parse(grid, "json");
      });
    }
以上で、サーバー側とクライアント側双方の実装は完了です。お疲れさまでした。
実行
それでは、作成したアプリケーションを実行してみましょう。 Eclipseのサーバータブを開いて、実行するサーバーを追加します。 (サーバータブが表示されていない方は、ウィンドウ>ビューの表示>サーバーを選択して表示させます)

図3. サーバータブ
サーバータブの何もない白い箇所で右クリック(Macではコンテキストメニュー表示)して新規からサーバーを選択します。
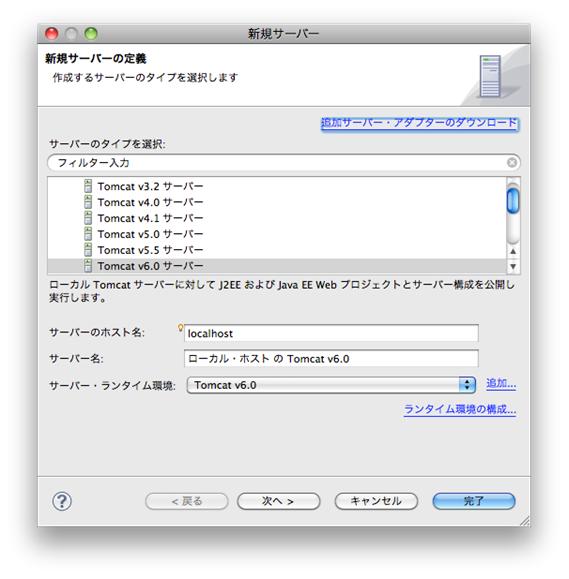
図4. 新規サーバー
「Tomcat v6.0 サーバー」を選択して「次へ」をクリックします。
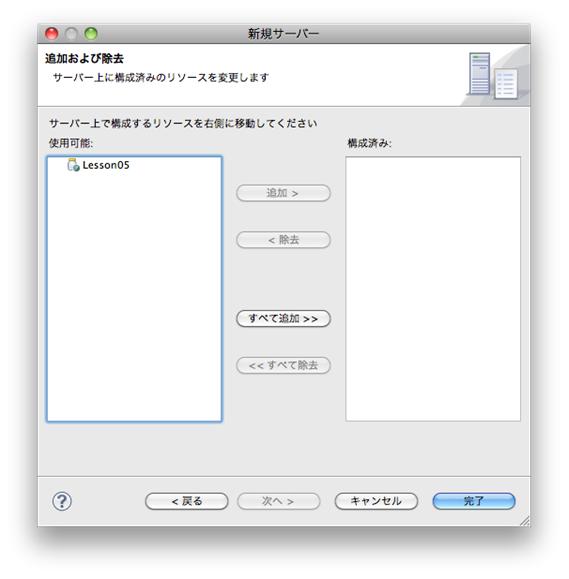
図5. 新規サーバー
使用可能欄に表示されているLesson05を選択して「追加 >」ボタンをクリックし、構成済み欄に移動させます。そして「完了」ボタンをクリックします 最後に、サーバータブに作成されたサーバーを右クリック(Macではコンテキストメニュー表示)し、開始をクリックします。サーバーが正常に起動すれば成功です。
それでは、起動したアプリケーションをブラウザで閲覧してみましょう。
ブラウザのアドレスバーに 「http://127.0.0.1:8080/Lesson05/lesson05/lesson05.html」 と入力して実行してみてください。下図のように表示されれば成功です。
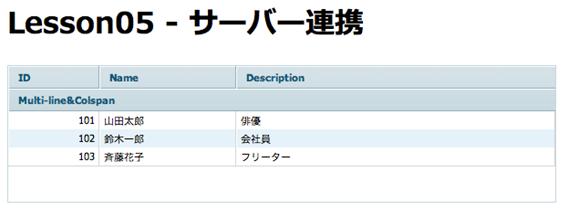
図6. 完成した画面
正しく表示できなかった方は、ソースコードに誤りがないか確認してみてください。最後に、lesson05.htmlのソースコード全体を掲載しておきます。
<html>
<head>
  <title>Lesson05 - サーバー連携</title>
  <link rel="stylesheet" type="text/css" href="codebase/dhtmlxgrid.css">
  <script type="text/javascript" src="codebase/dhtmlxcommon.js"></script>
  <script type="text/javascript" src="codebase/dhtmlxgrid.js"></script>
  <script type="text/javascript" src="codebase/dhtmlxgridcell.js"></script>
  <script type="text/javascript" src="../dwr/engine.js"></script>
  <script type="text/javascript" src="../dwr/util.js"></script>
  <script type="text/javascript" src="../dwr/interface/ Lesson05View.js"></script>
  <script type="text/javascript">
  <!--
  var Lesson05 = function() {
  };

  Lesson05.prototype = {
    init : function() {
      this.mygrid = new dhtmlXGridObject("mygrid");
      this.mygrid.setImagePath("codebase/imgs/");
      this.mygrid.setHeader("ID,Name,Description");
      this.mygrid.setColTypes("ro,ro,ed");
      this.mygrid.setInitWidths("*,150,350");
      this.mygrid.setColAlign("right,left,left");
      this.mygrid.setColSorting("int,str,str");
      this.mygrid.setSkin("light");
      this.mygrid.init();
      this.mygrid.attachHeader("Multi-line&Colspan,#cspan,#cspan");
      this.mygrid.attachEvent("onRowSelect", function(id) {
        alert("Selected row id: " + id);
      });
    },

    load : function() {
      var self = this;
      Lesson05View.getList(function(result) {
        var json = "";
        for (var i = 0; i < result.length; i++) {
          var dto = result[i];

          // JSONデータを作成する
          json += "{id: " + (i + 1) + "," +
            "data: [\"" + dto.id + "\",\"" + dto.name +
            "\",\"" + dto.description + "\"]},";
        }

        var grid = eval("({rows:[" + json.substring(0, json.lastIndexOf(",")) + "]})");
        self.mygrid.clearAll();
        self.mygrid.parse(grid, "json");
      });
    }
  };

  window.onload = function() {
    var dataGrid = new Lesson05();
    dataGrid.init();
    dataGrid.load();
  };
  //-->
  </script>
</head>
<body>
<h1>Lesson05 - サーバー連携</h1>
<div id="mygrid" style="width:600px;height:150px;"></div>
</body>
</html>
おわりに
連載の第五回目はいかがでしたか? JAVA や Spring Framework、DWR など、これまでに触れられていなかったソフトウェアが出現して戸惑った方がいるかもしれません(逆に、知っていて物足りなかった方もいるかも?)。 今回登場したソフトウェアについて、さらに詳しく知りたい方は、下記のサイトを参考にするとよいでしょう。
- Spring Frameworkで理解するDI
http://www.atmarkit.co.jp/fjava/rensai3/springdi01/springdi01_1.html
情報が古くなっていますが、Spring Frameworkについて知るにはよいサイトです。 - DWRはAjaxアプリを作りたいJava開発者にお勧め
http://www.atmarkit.co.jp/fjava/rensai4/myeclipse02/myeclipse02_1.html
簡単なアプリケーションを通してDWRの導入方法を解説しています。 - チャット作成で学ぶWebリモーティング
http://www.hakkaku.net/series/チャット作成で学ぶwebリモーティング
チャット作りを通して、DWRについて学んでいく連載記事です。
さて、今回を持ちまして「データグリッドを使ったRichなWebインタフェースを開発する」の巻は終了です。約5ヶ月間にわたり連載させていただきましたが、根気よく付き合っていただいた読者の皆様、そしてこの連載を校正してウェブ化していただいた弊社スタッフに感謝したいと思います。 次回以降の連載は検討中ですが、皆様にとって有益になる情報をご提供出来ればと思います。それではまた!
おしまい
※.記載されているロゴ、システム名、製品名は各社及び商標権者の登録商標あるいは商標です。